

Perequisites
Here are the Prerequisites of this article:
- Amazon Web Services (AWS) Free Tier Account
- Linux Operating System (OS)
Introduction
In the modern Software Development Life Cycle, the need to have storage where the different teams can fetch dependencies and data to build and test applications is essential. In this blog post, I will explain how to set up one of the most popular Artifact Repository (Nexus) on a remote Amazon Web Services (AWS) EC2 server and give a quick overview of what Nexus UI Dashboard is.
What is an Artifact?
An artifact is a result of the software development process that aids in describing the architecture, design, and functionality of the software. Build artifacts are the files generated during the building process, and they include distribution packages, WAR files, logs, and reports. Examples of artifacts used in software development include diagrams, images, meetings, software documentation, source code, prototype, risk assessments, etc.
In Development Operations (DevOps), an artifact may consist of the project source code, dependencies, binaries, or resources and could be represented in different layouts depending on the technology.
What is an Artifact Repository?
A central location for storing builds is an artifact repository. Most Artifact Repositories expose an API for automatically deploying builds to the environments in a Continuous Integration and Continuous Deployment (CI/CD) pipeline. An artifact repository is also called an Artifacts Management Tool and can be used to store, version, and deploy artifacts for builds.
An artifact repository controls the entire artifact lifecycle, supports various software package management systems, and keeps the CI/CD workflow consistent. There are three types of Artifact Repositories, and they include:
- Local Repository: a physical, locally controlled repository where artifacts can be placed after deployment.
- Remote Repository: a proxy that caches data for a repository controlled by a remote URL. A remote repository can only receive existing artifacts, and no new ones can be added.
- Virtual Repository: a repository that aggregates both local and remote repositories under a single URL.
Types of Artifact Repositories
As I mentioned earlier, Developers and DevOps Professionals can use Artifact Repositories, also known as Artifact Management Tools, to store, organize and distribute artifacts in a single centralized location.
Some of the types of Artifact Repositories are:
- Cloudsmith
- Amazon Elastic Container Registry (ECR)
- JFrog Artifactory
- Yarn
- NPM
- Pypi
- Sonatype Nexus
Most Artifact Repositories are essential during the Software Development Life Cycle (SDLC). The use of artifact repositories has the advantages listed below.
Dependency management: Artifact Repositories allow a version-controlled standard library to be shared by all development teams, thereby introducing a new level of collaboration.
Efficient Builds: Development time is saved because artifacts are easy to obtain. Developers and DevOps Professionals can cache artifacts locally after being downloaded rather than needing to be downloaded from open repositories.
Release stability: After being uploaded to a release repository, binary artifacts and metadata remain unchanged, promoting predictable and repeatable builds.
Audit: When standardizing software libraries and verifying the licenses of third-party components, artifact repositories' ability to track versions is helpful.
You can read about more types and benefits of Artifact Management Tools using this link.
Setting Up Nexus on AWS EC2 instance
Nexus is one of the most popular and most used repository management tools nowadays. Nexus allows storing and distributing components with native package manager compatibility. It also supports ecosystems such as Java/Maven, npm, NuGet, PyPI, RubyGems, docker, helm, etc. In this part of the blog post, you will learn how to set up Nexus on Amazon Web Service (AWS) EC2 instance.
Step 1: Install and configure AWS Command Line Interface (CLI) on your local PC
You can launch an EC2 instance on AWS using two methods. These methods are:
- AWS Console Management
- AWS CLI
I will install AWS CLI on a Linux OS in this blog post. Check this blog post to learn out how to install the AWS CLI on Windows and Mac OS. If you are using Linux OS, You can follow the instructions below to install AWS CLI.
- The first step is downloading the installation file using the following command.
curl "https://awscli.amazonaws.com/awscli-exe-linux-x86_64.zip" -o "awscliv2.zip"
- The downloaded file's contents must then be extracted using a file extractor program like unzip. Check out the command below to extract the file when using unzip.
unzip awscliv2.zip
- You must install the file's contents now that you have extracted them from the file. To install the contents, you'll need administrative access to your computer. Install the file with root access using the command below.
sudo ./aws/install -i /usr/local/aws-cli -b /usr/local/bin
- With the following command, you can verify that AWS CLI has been installed on your Linux computer.
aws --version
After verifying that you have installed AWS CLI on your Linux machine, you will need to configure it using the terminal. On the AWS Console Management, you must first create an Identity and Access Management (IAM) user in order to continue. An excellent resource for setting up an IAM user on AWS can be found here.
Enter the following commands on your local computer terminal to add the user after creating an IAM User through AWS Console Management.
aws configure
- A prompt will require you to provide the user Access Key, Secret Access Key, default region name, and default output format.

Step2: Launch and connect EC2 using AWS CLI
Now that you have successfully installed and configured AWS CLI on your local PC. You can now launch an EC2 instance using AWS CLI within your local PC terminal.
Follow the instructions below to Launch an EC2:
- The first step is to create a keypair file that you would use to connect to the EC2 instance.
aws ec2 create-key-pair --key-name "nexus-keypair" --query "KeyMaterial" --output text > nexus-keypair.pem
The command above allows you to create a keypair file named nexus-keypair on AWS and store the key in the current directory on your PC.
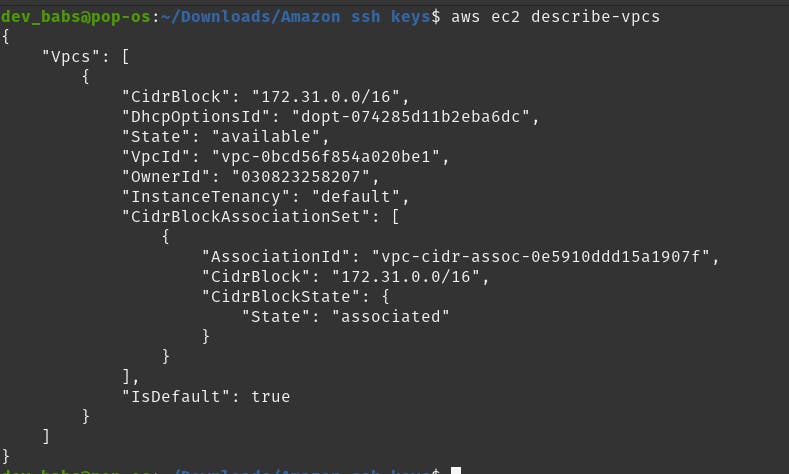
- After creating the keypair file, you will need to get the ID of the default VPC (Virtual Private Cloud). With the help of Amazon Virtual Private Cloud (Amazon VPC), you can start launching AWS resources into a defined virtual network.
aws ec2 describe-vpcs
- The next step is to create a security group and attach it to the EC2 instance. A security group acts as a virtual firewall to control incoming and outgoing traffic within an EC2.
aws ec2 create-security-group --group-name nexus-sg --description "nexus security group" --vpc-id vpc-0bcd56f854a020be1
In the command above, the group name was specified to be nexus-sg, the description was also provided as well as the default vpc id.
To attach the security group you created, you will need to get the GroupID of the security group. Security GroupID can easily be obtained through this command "aws ec2 describe-security-groups"
- You will need to create an inbound rule of how resources within the security group can be connected. In the case of EC2, you will need to create an SSH policy to allow inbound connections on EC2.
aws ec2 authorize-security-group-ingress --group-id sg-0cbfb1b5a8f8b3ff7 --protocol tcp --port 22 --cidr 0.0.0.0/0
In the command above, I specified the security group id, the protocol type to be TCP, SSH port 22, and the CIDR, which allows inbound connections within a particular Ip address.
- Phew!! You can go ahead to create an EC2 using this command.
aws ec2 run-instances --image-id ami-052efd3df9dad4825 --count 1 --instance-type c5a.xlarge --key-name nexus-keypair --security-group-ids sg-0cbfb1b5a8f8b3ff7 --subnet-id subnet-0cd11fe2d515b2781
When creating the EC2, I selected the image-id for ubuntu version 22.04 LTS, the number of instances, the instance type, key name, security group id, and the subnet id. You can read about each one of the parameters set in the command here.
- Finally, you can connect to the EC2 instance.
In my case I will be connecting to the ubuntu EC2 AMI.
ssh -i "nexus-keypair.pem" ubuntu@ec2-18-205-3-38.compute-1.amazonaws.com
Please note that the public key on your PC needs only to have read permission for the current user, and by default, AWS EC2 instances create a non-root user with sudo privileges.
Step 3: Install Nexus on EC2 instance
Great Job so far setting up an EC2 instance on AWS. Let's start installing nexus on the Virtual machine you have just created.
- The first step is to install Java. The newest version of nexus requires Java 8, so you will have to install java 8 on the EC2.
sudo apt-get install openjdk-8-jdk
The command above allows you to install Java 8 on a Debian-based Linux Operating System (OS).
- After successfully installing Java 8, the next step is to download nexus package on the EC2. You will have to navigate into the /opt directory. The /opt folder in Linux is reserved for installing add-on application software packages.
cd /opt
Once you are in the /opt directory, you can download nexus package with the command below.
sudo wget https://download.sonatype.com/nexus/3/nexus-3.41.0-01-unix.tar.gz
You can get the link to the installation file on Nexus official website.
- The next step is to unzip or untar the nexus file you downloaded.
sudo tar -zxvf nexus-3.41.0-01-unix.tar.gz
If you use the ls command to view the extracted files, you will notice that two folders were extracted.

nexus-3.41.0-01 folder contains the application and runtime of nexus while sonatype-work folder contains the local user or current user configurations for nexus. This is very good because anytime you update nexus, your configurations for the previous versions are stored in the sonatype-work folder
- After unzipping, you will need to change the owner of both nexus-3.41.0-01 and sonatype-work to a user apart from the root user. This is because of security reasons, as using root user permissions to run nexus is not ideal.

The commands below allow a user named ubuntu to gain ownership of the two folders.
sudo chown -R ubuntu:ubuntu nexus-3.41.0-01
sudo chown -R ubuntu:ubuntu sonatype-work
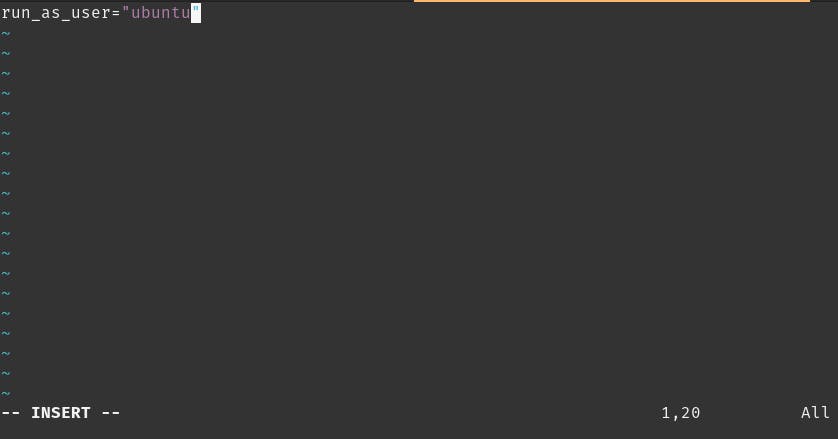
- Also, you will need to set Nexus configurations to run the non-root user as a Nexus user.
vim nexus-3.41.0-01/bin/nexus.rc
- Finally, It is now time to start the Nexus server.
nexus-3.41.0-01/bin/nexus start
By default, nexus runs on port 8081 on a local PC. If you try to access Nexus by using the public IP address of your EC2, you will likely get an error.
To rectify this, you will have to modify the security group for the EC2 to allow inbound requests on port 8081.
aws ec2 authorize-security-group-ingress --group-id sg-0669eb2a8d6aa5560 --protocol tcp --port 8081 --cidr 0.0.0.0/0
You can now try to access the nexus on a web browser using the Public IP address of the EC2 44.198.53.67:8081
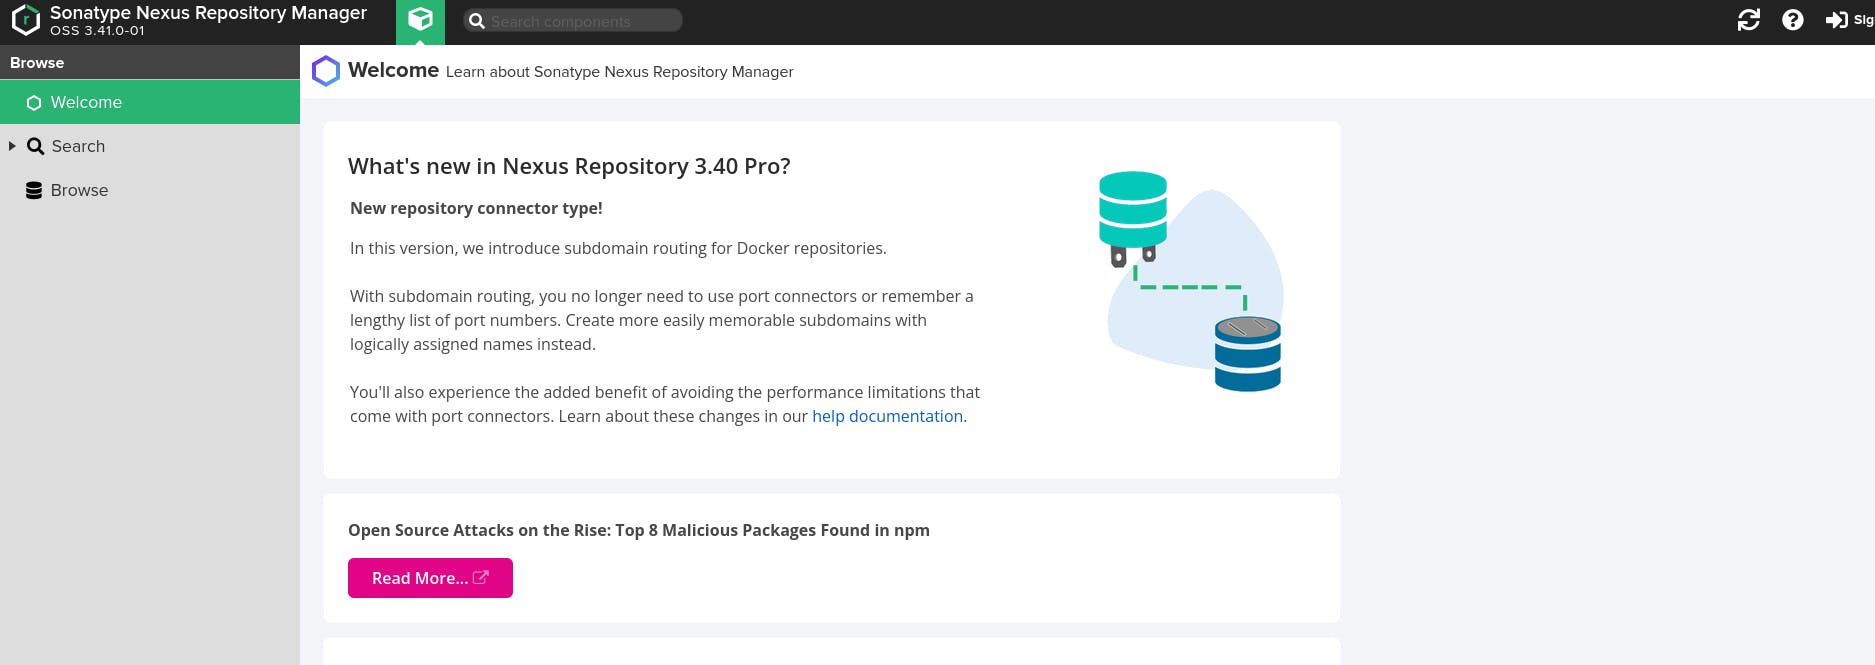
Booom, Nexus is now running on your remote EC2 server.
Overview of Sonatype Nexus UI and Dashboard
The last section of this article is to explain the features and items of the Nexus web client.
Nexus Homepage
Nexus Homepage dashboard contains the following information:
- Welcome Section: The welcome page contains information about the version of Nexus installed on the server, links to documentation on how to configure and use Nexus, and different Repository formats available in Nexus. Nexus supports docker, npm, PyPI, maven, NuGet, and more.
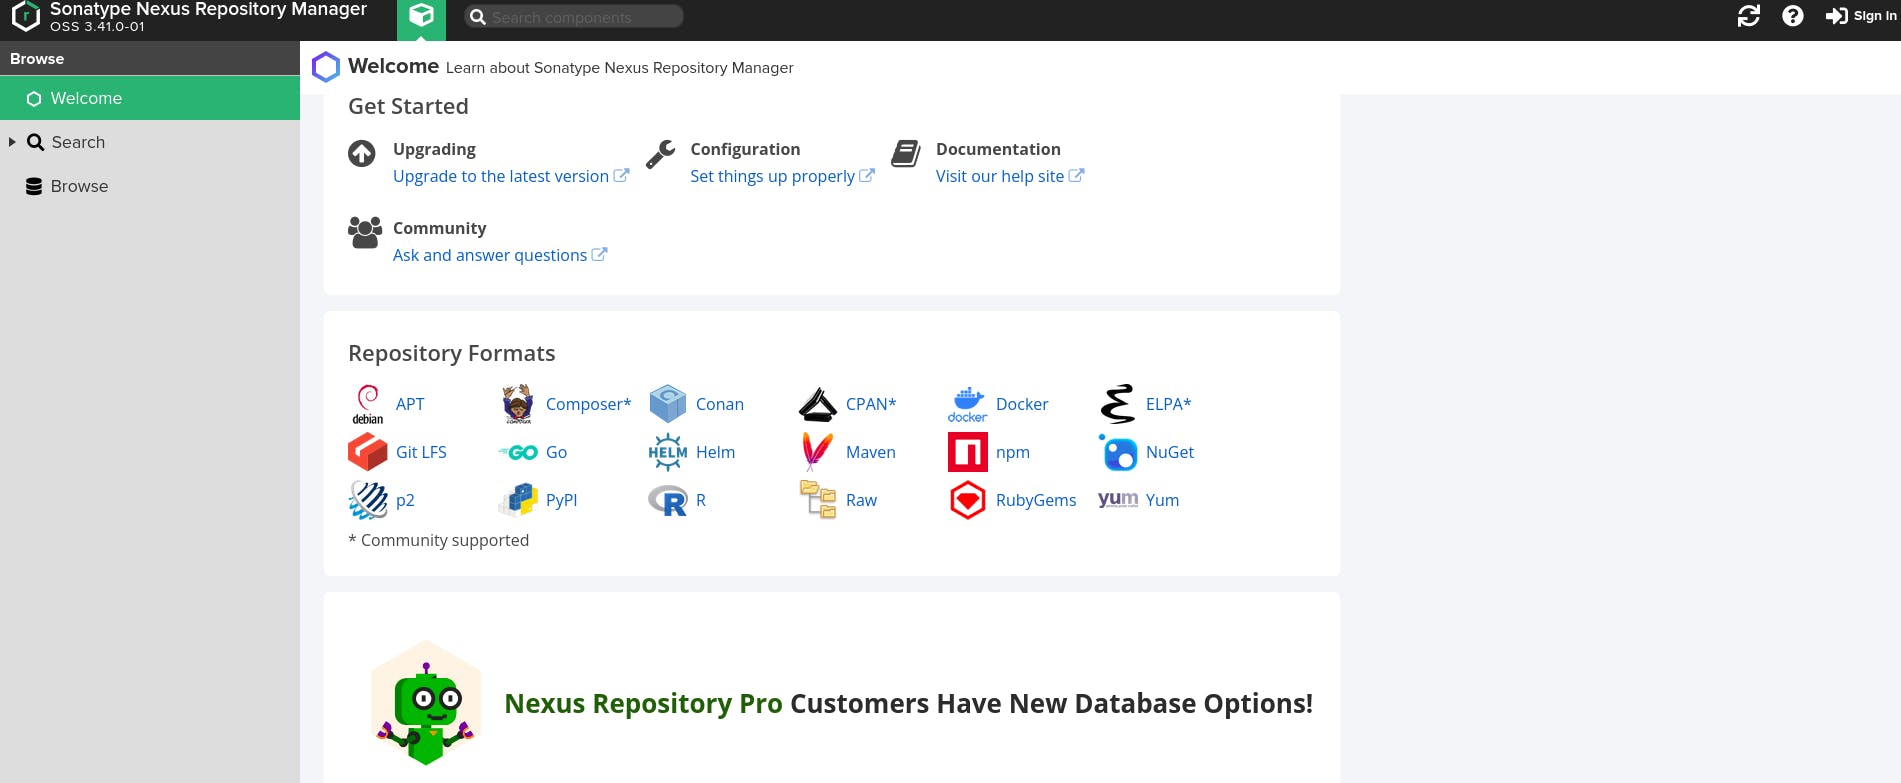
- Search Section: In this part of Nexus Homepage, you can search for components and packages uploaded to Nexus.

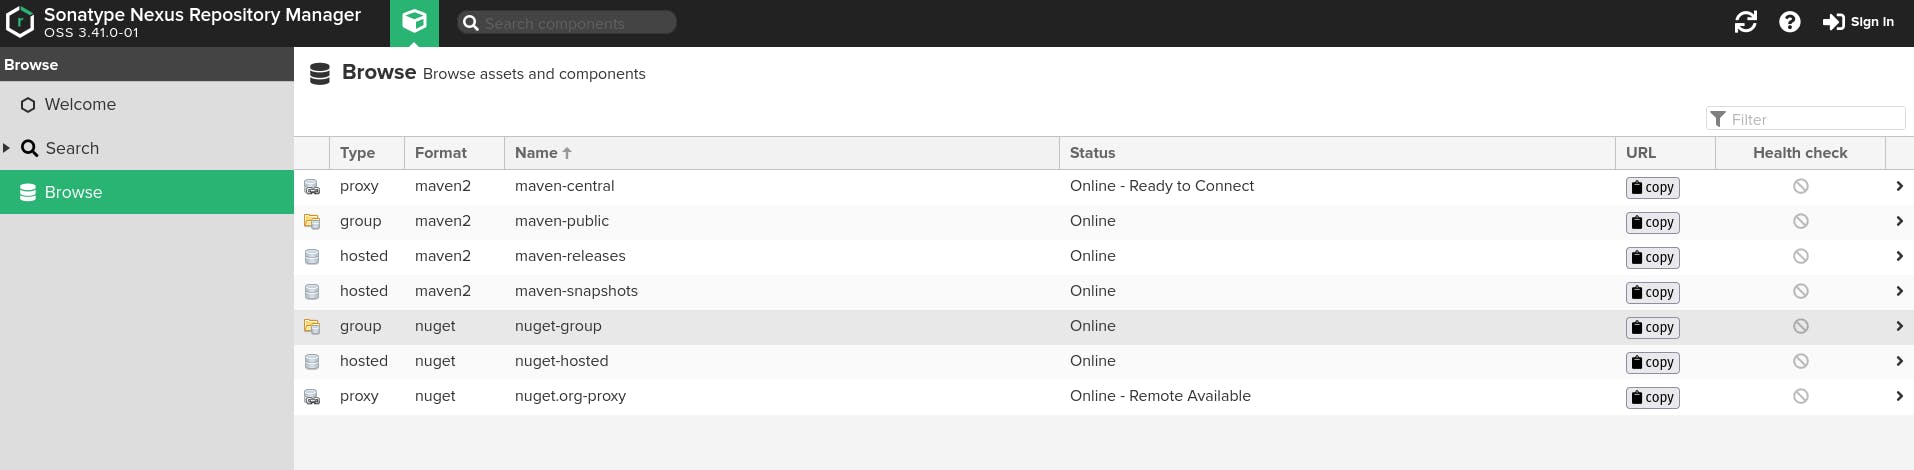
- Browse Section: The browse section of Nexus allows you to search and navigate through different assets and components (i.e., packages and files) uploaded on Nexus.
Login to Nexus Admin Dashboard
To access the admin dashboard, you will need the admin password.
Follow the steps below to gain access to the admin dashboard:
- The password is stored in the sonatype-work folder. The command to get the password is given below.

- After copying the password, navigate to the Nexus webpage and sign in. You will get a pop-up stating the requirement of the username and password.
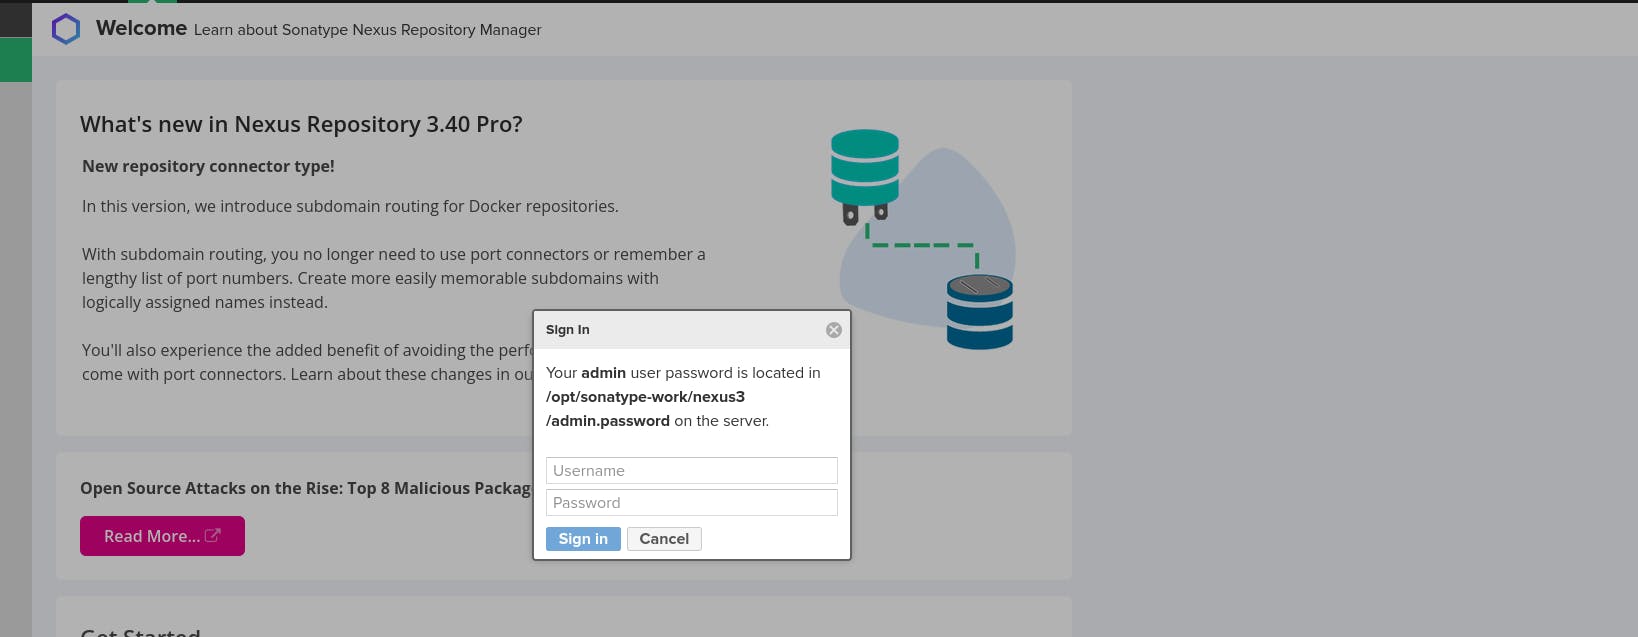
- Once you have signed in as an admin user, you must complete the setup wizard. The setup wizard will prompt you to change your password and configure anonymous access.
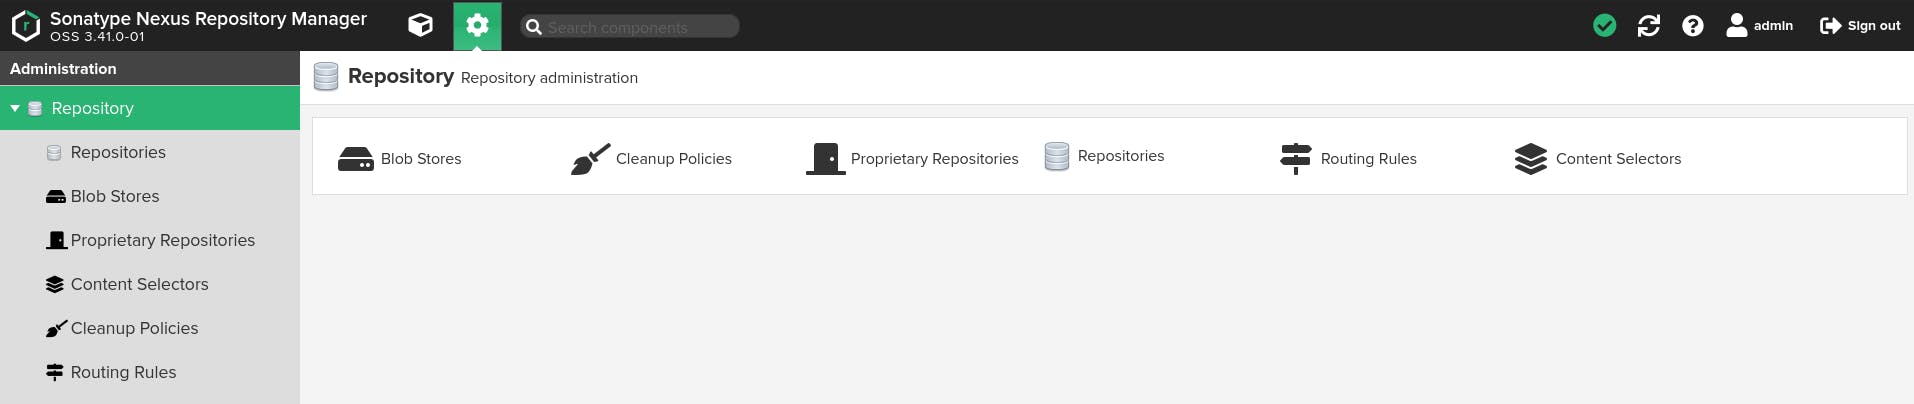
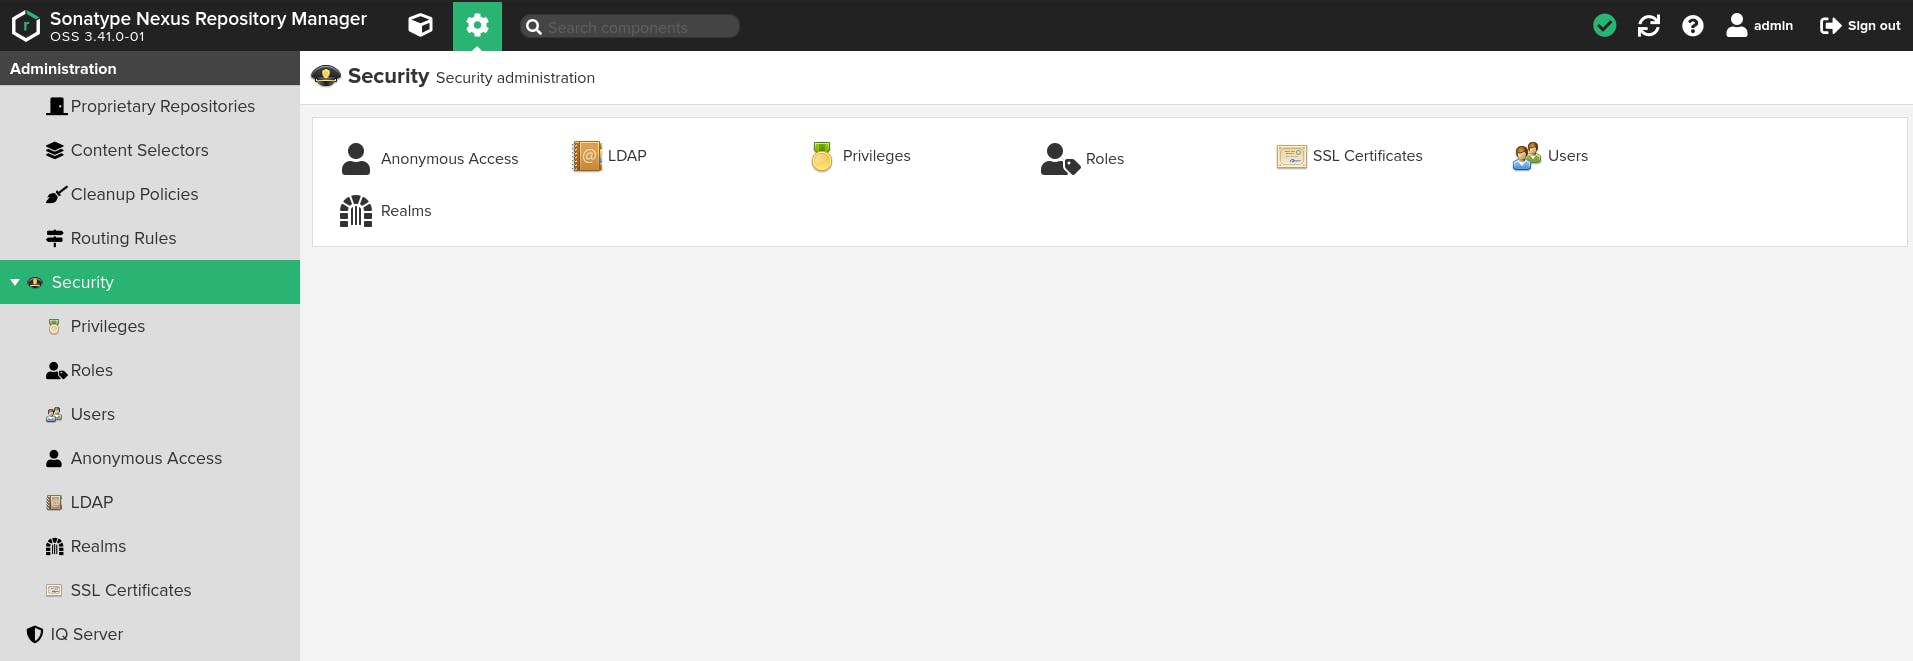
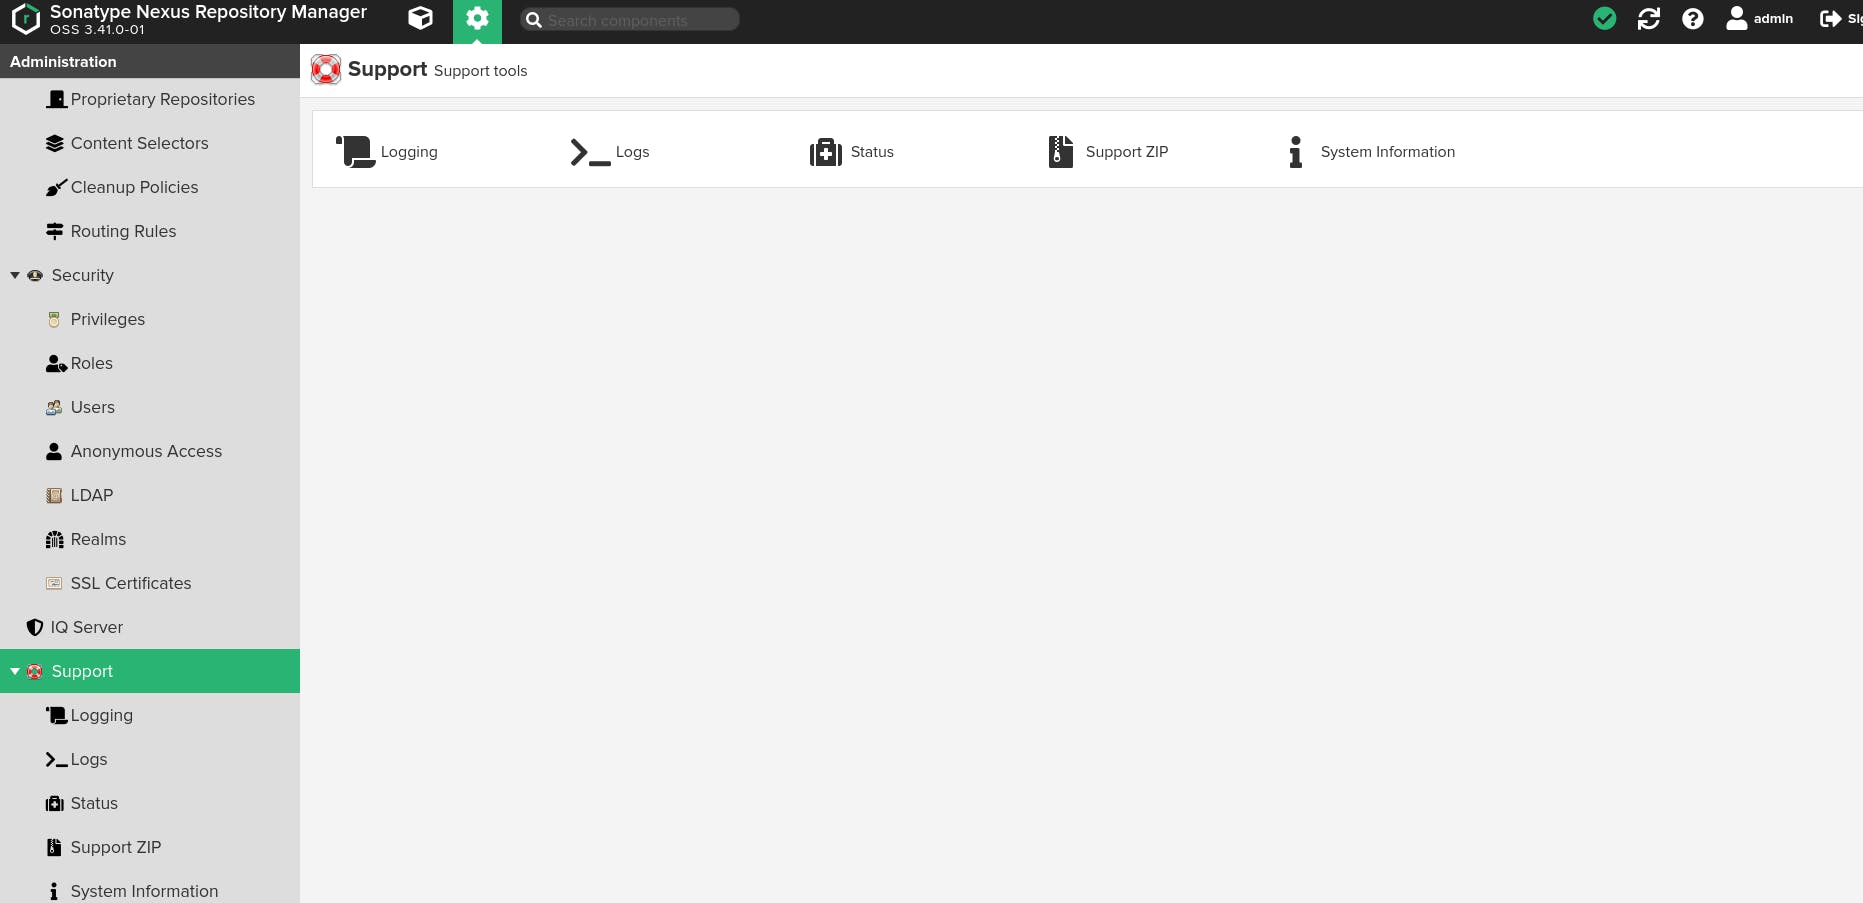
Nexus Admin Dashboard
Below is a quick overview of the Nexus Admin Dashboard.
- Repository The repository section of the Nexus Admin dashboard contains blob stores, proprietary repositories, routing rules, cleanup policies, repositories, and content selectors. You can read about what the repository section can do here.
- Security The security section contains configurations for privileges, roles, users, anonymous access, Lightweight Directory Access Protocol (LDAP), realms, and SSL certificates. You can read about configurations for security in Nexus here.
- Support The support section contains vital information on logging, logs, status, support ZIP, and system information. To configure support for Nexus, check out this documentation.
- System The system section contains configurations for API, Bundles, capabilities, Email Server, HTTP, Licensing, Nodes, and Tasks. You can check out this [resource](help.sonatype.com/repomanager2/configuration] to understand the system configurations for Nexus.

Conclusion
Nexus is one of many Repository Managers available in the DevOps Ecosystem. Although you would not have to set up Nexus manually most of the time, it is good to understand how it is installed on a server. It allows you to troubleshoot errors and set up Nexus on any remote servers on any Cloud Provider if required.
I'd love to connect with you at Twitter | LinkedIn | GitHub